

Home > News > Trailer Hitch Receiver: Sizes, Weight Ratings & How to Install


Trailer Hitch Receiver: Sizes, Weight Ratings & How to Install
Have you ever watched a pickup truck hauling cargo and wondered what that connection point between the vehicle and trailer actually is? The answer is the trailer hitch receiver. This seemingly simple square steel tube is actually the foundation of the entire towing system. It must withstand all the complex forces generated during towing. Choose the right one, and it will work reliably for years; choose the wrong one, and you risk equipment damage at best, or a serious accident at worst.
This article will walk you through trailer hitch receiver sizes, classes, and how to properly select and match this critical component.
Understanding the Trailer Hitch Receiver
What Exactly Is It?
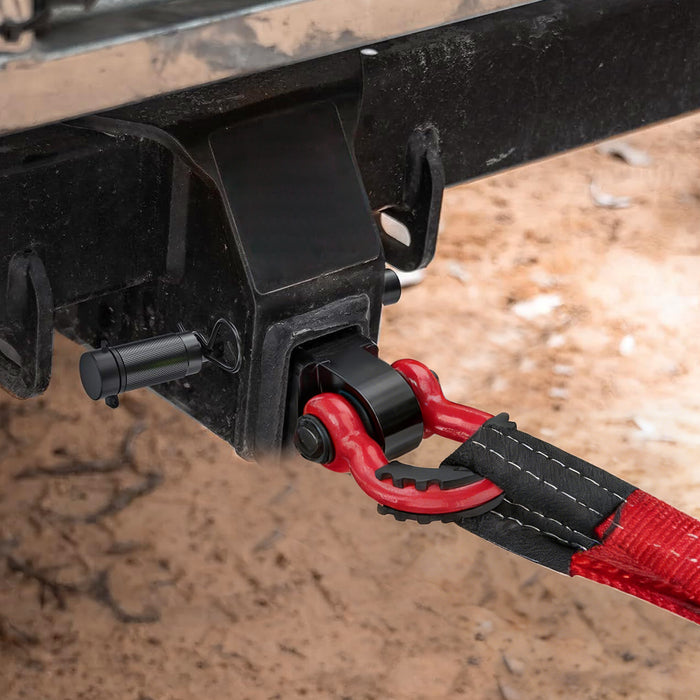
A trailer hitch receiver is a square metal tube — usually steel — mounted to the rear of your vehicle’s frame. Think of it as the wall outlet of the towing world. When you need to tow, you plug in a ball mount (the drawbar with the hitch ball on it). When you’re done, you unplug it. In between, the receiver is what anchors everything.
Why Is It So Important?
The receiver itself is a passive component — it doesn’t connect to the trailer directly. But it is the link that sits between your frame and everything else: ball mount, hitch ball, trailer coupler, and eventually the trailer itself. Every force generated during towing — downward pressure from tongue weight, pulling force during acceleration, pushing force during braking, twisting force through turns — flows through this one steel tube into your vehicle’s frame.
PRO TIP: A towing system is a chain: receiver → ball mount → hitch ball → coupler. Your actual towing capacity is the lowest number in that chain, not the highest. A 12,000-lb receiver with a 5,000-lb ball mount can only tow 5,000 lbs.
Receiver Size vs. Class: The Two Things You Must Get Right
Many people confuse a receiver's "size" with its "class." Here's the simple breakdown: Size is the physical opening dimension; class is the weight it can handle. They are related, but you can't use one to determine the other.
The Five Receiver Classes
| Class | Receiver Size | GTW Max | Tongue Weight Max | Typical Vehicles |
|---|---|---|---|---|
| Class I | 1-1/4" | 2,000 lbs | 200 lbs | Sedans, compact crossovers |
| Class II | 1-1/4" | 3,500 lbs | 350 lbs | Midsize sedans, minivans, small SUVs |
| Class III | 2" | 8,000 lbs | 800 lbs | Half-ton pickups, full-size SUVs |
| Class IV | 2" | 10,000–12,000 lbs | 1,000–1,200 lbs | Half-ton and 3/4-ton pickups |
| Class V | 2-1/2" or 3" | 18,500–21,000 lbs | 1,850–2,100 lbs | 3/4-ton duallys, 1-ton trucks, commercial |
Class 1 and 2 Receivers
These two classes are very similar in design, both using a 1-¼ inch receiver opening and serving the small passenger vehicle market.
- Typical Vehicles: Sedans, minivans, and other everyday passenger vehicles
- Receiver Size: 1-¼ inches (same for both)
- Weight Capacity Difference: Class 1: Maximum towing capacity of 2,000 lbs;Class 2: Maximum towing capacity of 3,500 lbs
- Typical Uses: Towing lightweight utility trailers, carrying cargo carriers
Class 3 and 4 Receivers
These are the most frequently seen receiver classes on the road today, dominating the SUV and pickup truck market. Both feature a 2-inch receiver opening and are compatible with weight distribution hitches.
Typical Vehicles:
- All types of SUVs and crossovers
- Midsize pickups
- Half-ton full-size pickups
- All ¾-ton and 1-ton trucks manufactured before 2008
Receiver Size: 2 inches (same for both)
Weight Capacity Difference:
- Class 3: Maximum towing capacity of 8,000 lbs
- Class 4: Maximum towing capacity of 10,000 lbs
Typical Uses: Medium-sized travel trailers, boat trailers, utility trailers
Class 5 Receivers
This is the highest-capacity receiver class, with opening sizes that vary based on the specific design, primarily serving the heavy-duty commercial sector.
Typical Vehicles:
- Heavy-duty full-size trucks
- Commercial vehicles
Receiver Size: 2.5 inches or 3 inches
Weight Capacity:
- 2.5-inch size: Maximum towing capacity of 18,500 lbs
- 3-inch size: Maximum towing capacity of 21,000 lbs
Size Distribution Notes:
The 2.5-inch receiver is the most common Class 5 size. It's widely found on most ¾-ton pickups produced after 2008 and on most 1-ton pickups
The 3-inch receiver is much less common—it's the rare breed of hitch receiver sizes, found primarily on select F-350 models manufactured after 2017.
Typical Uses: Large construction equipment, commercial heavy-duty towing
A Critical Reminder: Size Does NOT Equal Class
This is a crucial point that needs emphasis: You cannot judge a receiver's towing capacity by its opening size alone.
Many people automatically assume that any 2-inch receiver is a Class 3 or Class 4 with substantial towing capability. But that's simply not true. You can find 2-inch receivers on the market with a maximum towing capacity of only 4,000 lbs (which is effectively a lower class), while others with the same 2-inch opening can handle over 10,000 lbs (meeting Class 4 standards).
A receiver's actual load class depends on several factors:
- Steel thickness and grade — two 2-inch tubes can have wall thicknesses that differ by 50%
- Structural design — gusseting, cross-bracing, and mounting plate design all affect load distribution
- Attachment method — how the receiver connects to the frame dictates how much force it transfers
- Weld quality and manufacturing standards — a receiver is only as strong as its weakest weld
PRO TIP: A 2-inch receiver is not automatically a Class III or Class IV. There are 2-inch receivers on the market rated for as little as 4,000 lbs — which is essentially a lower class in a 2-inch body. You must verify the rating sticker or stamp on the receiver itself. If the sticker is missing or painted over, consult your owner’s manual or VIN with a dealership. Never guess.
How Receiver Size Affects Your Entire Towing System
A towing system is like a chain—its strength is determined by its weakest link. Choosing the wrong receiver size creates problems throughout the entire setup.
Impact on Trailer Hitch Installation
The trailer hook is installed on the mounting base, which is inserted into the receiver. If the size of the receiver does not match:
- The mount won't insert at all, or it will fit so loosely that it wobbles
- The height will be wrong, preventing the trailer from riding level
- The trailer will sway while driving, accelerating wear on all components
Impact on Hitch Pin Matching
You need a hitch pin to secure the ball mount. Different receiver sizes require different pin diameters:
- 1-¼ inch receivers: Must use a ½ inch hitch pin
- 2 inch, 2.5 inch, and 3 inch receivers: Must use a ⅝ inch hitch pin
What happens if you use the wrong pin? Either it won't fit at all, or there will be too much slop. A pin rattling around in an oversized hole will gradually deform the opening over time—and could even work its way out.
Impact on Weight Distribution Systems
If you're towing something very heavy (more than half your vehicle's weight), the weight distribution system will help the vehicle maintain smooth driving. But these systems have strict requirements for the receiver: it needs both sufficient load capacity and the right size to mount the hardware.
Specifically notes: Even if the brackets and mounts are installed perfectly, if the receiver isn't the right class or doesn't match, the entire weight distribution system will fail to function correctly.
How to Accurately Measure Your Receiver Size
If you're unsure what size receiver you have, measuring it yourself is simple:
Step 1: Clean the Opening
Receiver tubes collect dirt, grime, and rust. Wipe the inside clean, especially the inner edges, to ensure an accurate measurement.
Step 2: Measure the Inside Width
Use a ruler or caliper to measure the inside width of the square opening. Make sure you're measuring the inner diameter, not the outer edges of the tube.
Step 3: Match to Standard Sizes
Compare your measurement to these standard sizes:
| Measurement | Standard Size |
|---|---|
| ~32mm (1-1/4") | Class I or II |
| ~51mm (2") | Class III or IV |
| ~64mm (2-1/2") | Class V |
| ~76mm (3") | Class V (heavy) |
Step 4: Double-Check
After measuring the size, look for a class label or stamp on the receiver itself. If you have access to your vehicle's owner's manual, cross-reference the information there as well.
Hitch Pin Sizes: The Detail Most People Miss
Your hitch pin is the only thing keeping the ball mount from sliding out of the receiver at highway speed. And the pin size is determined by the receiver size — you can’t mix and match.
| Receiver Size | Required Hitch Pin | Notes |
|---|---|---|
| 1-1/4" | 1/2" diameter | Smaller pin for smaller receiver |
| 2" | 5/8" diameter | Standard for most pickups and SUVs |
| 2-1/2" | 5/8" diameter | Same pin diameter as 2-inch receivers |
| 3" | 5/8" diameter | Same pin diameter as 2-inch receivers |
What happens if you use the wrong pin? A pin that’s too large won’t fit at all. A pin that’s too small rattles in the hole — and over time, that play deforms the receiver opening and the pin hole, creating a loose fit that gets looser with every trip. On a rough enough road, a loose pin can walk itself out completely.
PRO TIP: A $5 spring-clip hitch pin is fine for function, but it slides out in seconds — and offers zero theft protection. A locking hitch pin with a tubular key stops opportunistic theft and won’t vibrate loose on rough terrain.
Common Mistakes and Their Consequences
Understanding these common errors can help you avoid potentially dangerous situations:
Using a Size Reduction Adapter
- The Problem: Adapter sleeves introduce extra play into the system
- The Consequence: They cause wobbling, accelerated wear, and long-term fit issues.
Guessing Size by Eye
- The Problem: Visual estimation is inaccurate
- The Consequence: You'll buy accessories that either won't fit or will be dangerously loose. A few millimeters of difference is hard to judge by looking.
Ignoring Load Class
- The Problem: Focusing only on size while ignoring the weight rating
- The Consequence: The receiver's actual capacity is insufficient for your needs, creating a major safety hazard. Size does not determine class.
Perfect Products for Every Towing Need
Now that you understand how critical the connection between your receiver and ball mount is, here are three exceptional options designed for different towing applications. All three are built for 2-inch receivers and represent the quality and precision we've been discussing throughout this guide.
2" Receiver Heavy Duty Adjustable Drop Trailer Hitch Mount
This 2" receiver heavy duty trailer hitch lets you fine-tune your ball height for a perfectly level trailer—critical for the safe towing we've been emphasizing. The dual locking pins provide peace of mind whether you're on the highway or leaving your rig unattended.
Perfect for those who tow multiple trailers or need height flexibility
Features:
-
Material: High-quality aluminum with oxidized protective finish for rust, corrosion, and water resistance
-
Receiver Fit: Precision-machined rounded corners ensure easy installation in any 2-inch trailer receiver with a tight, wobble-free connection
-
Adjustment Range: 6-inch drop to 6-inch rise (in 1-inch increments)
-
Towing Capacity: 12,000 lbs GTW (with 2-5/16" ball) / 7,500 lbs GTW (with 2" ball)
-
Security: Includes dual stainless steel anti-theft locks with weatherproof keyhole covers
Compatible Vehicles: Ford, Dodge Ram, Chevy Silverado, Toyota Tundra/Tacoma, Nissan Titan, Jeep Wrangler, and more
2" Receiver Heavy Duty Tri-Ball Trailer Hitch Mount
Whether you're towing different trailers or need recovery options, versatility matters. This heavy duty tri-ball trailer hitch gives you three ball sizes plus a recovery shackle in one unit—so you're always prepared. The chrome plating on all balls and the hook ensures long-lasting corrosion resistance.
Perfect for those who need versatility—towing different trailers and off-road recovery capability
Features:
-
Ball Size Ratings: 1-7/8" (5,000 lbs), 2" (6,000 lbs), 2-5/16" (10,000 lbs)
-
Recovery Shackle: ¾-inch D-ring
-
Receiver Size: 2 inches
-
Construction: Heavy-duty steel with black powder coat finish
-
Finish: All three balls and the tow hook feature chrome plating for corrosion resistance
-
Compatibility: Designed for Class III through Class V towing systems with 2-inch receivers
2" Receiver Heavy Duty Towing Ball Trailer Hitch Mount
This 2" receiver towing ball trailer hitch design reduces stress on your equipment during tight maneuvers, while the integrated lock pin provides the security we discussed earlier. The separate heavy-duty shackle adds serious recovery capability when you need it.
Perfect for demanding applications requiring exceptional strength and maneuverability
Features:
-
Material: Premium forged steel with zinc electroplating and powder coat finish for excellent rust resistance and all-weather durability
-
Design Features: Rotating design with ball-bearing swivel for smooth movement, optimized length ensures secure connection with trailer tube
-
Work Load Limit: 22,000 lbs; Breaking Strength: 50,600 lbs
-
D-Shackle: Working load of 17,600 lbs; Breaking strength of 39,600 lbs
-
Trailer Ball: 2-inch ball (working load 6,000 lbs, breaking strength 14,900 lbs)
Recommendations for Users
Verify Before You Buy
Before purchasing any towing accessory, know your vehicle's receiver size and class. This is the most basic step—and the one most often skipped.
Don't Just Look at Size
A 2-inch receiver is a 2-inch receiver, yes. But 2-inch receivers come in many different ratings. Always check the stated load class to ensure it meets your actual needs. As the source material says: Never guess your hitch class, receiver size, or connector type.
Inspect Regularly
Receivers live outside, exposed to weather and constant stress. Check periodically for rust, deformation, cracked welds, and pin wear.
Don't Skimp on the Lock
The lock on your receiver might seem like a small detail, but it matters. The source material emphasizes: A tight-fitting, pick-resistant lock is your first and best line of defense against theft or failure on the road.
How to Install a Trailer Hitch Receiver
Installing a receiver hitch is a driveway-level DIY job for most vehicles. It takes one to two hours with basic tools and a helper to lift the hitch into position. Chris from O’Reilly breaks it down, and DIYers who’ve done it on their own vehicles confirm the same process works across sedans, SUVs, minivans, and trucks.
What You’ll Need
- Torque wrench — most receiver hitches call for 75–110 ft-lbs of torque. Set it to the manufacturer’s spec in your hitch instructions (79 ft-lbs is a common number)
- Socket set with deep sockets — hitch bolts are long, and a standard socket may not reach past the threaded end
- Wire brush — for cleaning dirty frame threads. An old toothbrush won’t cut through rust — switch to a wire brush that fits inside the threads
- Penetrating oil or spray lubricant — frees rusted threads and helps flush out debris
- C-clamps — hold the hitch in position while you start the bolts
- Wheel chocks — one behind each rear tire before you even start
- Power drill — only if your vehicle doesn’t have pre-drilled mounting holes (most do)
- Second person — a Class III or IV receiver weighs 40–50 lbs, and lifting it overhead while starting bolts is a recipe for frustration and stripped threads
One DIYer puts it honestly: “If you try to do this by lifting it and putting bolts in, you’re just going to frustrate yourself. Get somebody to help you.”
Step 1: Know Your Numbers
Before you touch a wrench, confirm three things:
- Your vehicle’s maximum towing capacity (owner’s manual)
- The receiver’s class and weight rating (on the product label)
- That the receiver is rated for your vehicle — never install a lower-class receiver on a vehicle capable of towing more than the receiver can handle
Also, be realistic about what you’re actually towing and the tongue weight. A 6,000-lb loaded trailer with 900 lbs on the coupler will exceed the tongue rating of some Class III receivers — even if the GTW number looks fine on paper.
Step 2: Prepare the Vehicle
-
Parking brake on, wheels chocked. This is non-negotiable — you don’t want the vehicle moving while you’re underneath it applying torque
-
Locate the mounting points. Most vehicles leave the factory with threaded mounting holes in the frame, pre-drilled for a hitch receiver even if one wasn’t installed at the factory.
Step 3: Clean the Mounting Threads
This is the step that separates a smooth install from a two-hour battle. Frame mounting holes that have never had a hitch installed collect years of road grime, moisture, and rust.
The right approach:
- Spray penetrating oil into each threaded mounting hole
- Run a wire brush inside the threads — a round brush that fits the hole diameter works best
- Blow out debris with compressed air if you have it (or spray more lube and let it drain)
- Test-fit one of the bolts by hand — it should thread in smoothly with finger pressure. If it fights you, clean more
Step 4: Mount the Hitch
-
Check the washers. Receiver hitch washers typically have a cupped side with barbs — those barbs face the hitch, not the bolt head. They bite into the steel and prevent the bolt from loosening over time
-
Start with the center bolts on both sides. Thread each bolt in by hand — just a few turns, loosely, so the hitch can still shift for alignment.
-
Once both center bolts are started, install the remaining bolts. Leave everything finger-tight for now so the hitch can settle flush against the frame rails
-
If factory bolts are already in the mounting holes: Use the new bolts that came with your hitch. The old bolts may not be graded for the load class of your new receiver
Step 5: Torque to Specification
This is the step that makes your hitch safe at highway speed. Finger-tight bolts loosen. Guessing the torque strips threads or leaves the hitch unsafe.
-
Use a torque wrench — set it to the exact specification in your hitch’s instruction manual. Common range: 75–110 ft-lbs. One installer’s hitch specified 79 ft-lbs. Another common spec is 100–150 ft-lbs
-
The torque wrench clicks when you reach the set pressure — stop immediately. Over-torquing stretches and weakens the bolt
PRO TIP: Re-torque the mounting bolts after 500 miles of towing. Thermal cycling and vibration settle the hardware in those first few trips. Every manufacturer recommends it, and almost nobody does it.
Step 6: Install the Ball Mount and Hitch Ball
With the receiver bolted to the frame, the receiver itself is done. Now you need the components that plug into it.
Installing the ball mount:
- Slide the ball mount shank into the receiver tube
- Align the pin holes on the shank and receiver
- Insert the hitch pin through and secure the retaining clip (or lock with a keyed pin)
Installing the hitch ball:
- Remove the nut and lock washer from the ball’s threaded shank
- Pass the shank through the top of the ball mount hole
- Replace the lock washer and nut, tighten by hand, then torque to specification
Step 7: Wiring and Final Check
To legally tow, your vehicle’s brake lights and turn signals must connect to the trailer through a wiring harness. Most trucks and SUVs have a pre-wired connector near the receiver — many even ship with a 4-pin or 7-pin plug. If yours doesn’t, you’ll need to install a trailer wiring harness.
Final walk-around:
- All bolts torqued to spec?
- Hitch pin in place and clipped?
- Ball mount secure — no excessive play?
- Ball nut tight and lock washer compressed?
- Wiring connected and lights tested?
Shake the ball mount side to side. A little movement is normal (the 1/16-inch gap between shank and receiver is by design). Excessive slop means something is loose or the wrong size.
Conclusion:
Choosing the right trailer hitch receiver and ball mount isn't just about size—it's about understanding class ratings, ensuring precise fit, and never settling for "close enough." From measuring your receiver correctly to avoiding common mistakes like using adapters, every detail matters when it comes to safe towing. Whether you need the adjustability of our aluminum mount, the versatility of our triple-ball design with recovery shackle, or the rotating strength of our forged steel option, we have the perfect match for your vehicle.
Visit www.trucktok.com today to explore our complete line of premium trailer hitch components. All our products meet or exceed industry standards, and our team is ready to help you find the right fit. Don't leave safety to chance—get the precision your towing system deserves and hit the road with confidence.
FAQs About Hitch Receiver
Q1: I have a 2-inch receiver, how do I know if it's Class 3 or Class 4?
A1: You can't tell by looking—you need to check the manufacturer's label or stamp on the receiver itself. Look for a sticker or embossed rating on the receiver tube. If you can't find one, consult your vehicle owner's manual or contact the dealership with your VIN.
Q2: Do I really need a locking hitch pin?
A2: If you ever park in public areas or leave your trailer unattended, absolutely. A locking pin prevents theft of your ball mount and accessories. More importantly, it prevents the pin from vibrating out while you're driving—a potential disaster on the highway.
Q3: Can I tow more than my receiver's rated capacity if my vehicle can handle it?
A3: Never. The receiver's rating is the absolute maximum—exceeding it risks catastrophic failure. Your towing system is only as strong as its weakest component, and that includes the receiver. Always stay within the manufacturer's specified limits.
Q4: What's the difference between GTW and tongue weight?
A4: GTW is the total weight of your loaded trailer. Tongue weight is the downward force the trailer exerts on the hitch—typically 10-15% of GTW. Both matter: your receiver has separate ratings for each, and exceeding either one is dangerous.
Q5: How often should I inspect my receiver and ball mount?
A5: At minimum, inspect before every towing season and after any heavy-use trip. Look for rust, deformation, cracked welds, and worn pin holes. Also check that your ball is still perfectly round—a flattened or grooved ball needs immediate replacement.